

🥁 The New Drummer's Guide to Choosing the Perfect Drumsticks

Howdy! I’m Wesley, and if you’re reading this, you’ve just taken the first, exhilarating step into the world of drumming. Welcome! Being a musician from Georgetown, Kentucky, I’m always thrilled to see folks picking up the sticks.
I’ve been drumming professionally for over 15 years—touring, cutting tracks in Nashville, and currently, running my own lesson studio right here near home. I've taught hundreds of new students, and every single time, the first real question we tackle (right after "What kind of kit should I get?") is:
"Which drumsticks should I buy?"
It sounds simple, right? Just a couple of hickory dowels. But I promise you, choosing your first pair of sticks is one of the most critical decisions you'll make. The right stick will make your practice sessions easier, more comfortable, and ultimately, more fun. The wrong one can lead to unnecessary fatigue, poor technique, and maybe even the frustration that makes you want to hang 'em up. We're not letting that happen.
This isn't going to be some quick, surface level checklist. We’re going to dive deep… the way a pro approaches the tools of the trade, just like we approach our bourbon: with serious consideration. Consider this your definitive guide to understanding the drumstick anatomy, material science, and sizing system, all specifically tailored for you, the new drummer.
Let’s get into it.
I. The Anatomy of the Stick: More Than Just a Dowel
Before you can choose the right stick, you need to know what all those different parts are called and what they do. Every single component affects how the stick feels, plays, and sounds, from the quietest little jazz ride to the biggest backbeat.
1. The Tip (Bead)
The tip is the part that strikes the drumhead or cymbal, and it’s the primary factor in determining your sound.
Oval/Acorn: This is the most popular and versatile tip shape. It offers a full, broad sound on drums and a clear, articulate tone on cymbals. This is what I usually recommend for brand new drummers—it’s the classic, all purpose tip.
Barrel: A thicker, rounder shape that creates a deep, fat sound on drums with a medium contact patch. Great for rock and heavier playing.
Round/Ball: This small, spherical tip creates a super focused, very bright, and clear cymbal sound because the contact point is tiny and consistent.
Tear Drop/Pointed: This shape offers a dark, warm, and very subtle sound. Less volume and great for complex jazz patterns or light acoustic work.
2. The Shoulder (Taper)
The shoulder is the section where the stick narrows down to the tip. This is where the magic of rebound and feel happens.
Long Taper (Thin Shoulder): The stick tapers (slims down) gradually. This makes the stick feel lighter, faster, and more responsive (more bounce). It's great for speed and finesse but sacrifices a bit of durability.
Short Taper (Thick Shoulder): The stick tapers sharply near the tip. This makes the stick feel heavier, more durable, and powerful , with less natural bounce. Great for heavy hitting.
Medium Taper: A good balance of power and rebound. This is that perfect, versatile taper for learning the ropes.
3. The Body (Shaft)
This is the main, uniform part of the stick. Its diameter determines the overall weight and heft, which is crucial for comfort.
4. The Butt (Back End)
The opposite end of the tip. Sometimes, drummers intentionally flip the stick around and play with the butt end for a thicker, louder, and more durable attack, but for now, focus on mastering the tip!
II. Material Matters: Wood vs. Nylon
The material your stick is made from dictates its feel, durability, and tone. For beginners, the choice is usually between the big three woods.
1. Wood (The Classic Choice)
| Wood Type | Feel & Weight | Sound Characteristic | Durability | Best For... (Beginner Context) |
| : | : | : | : | : |
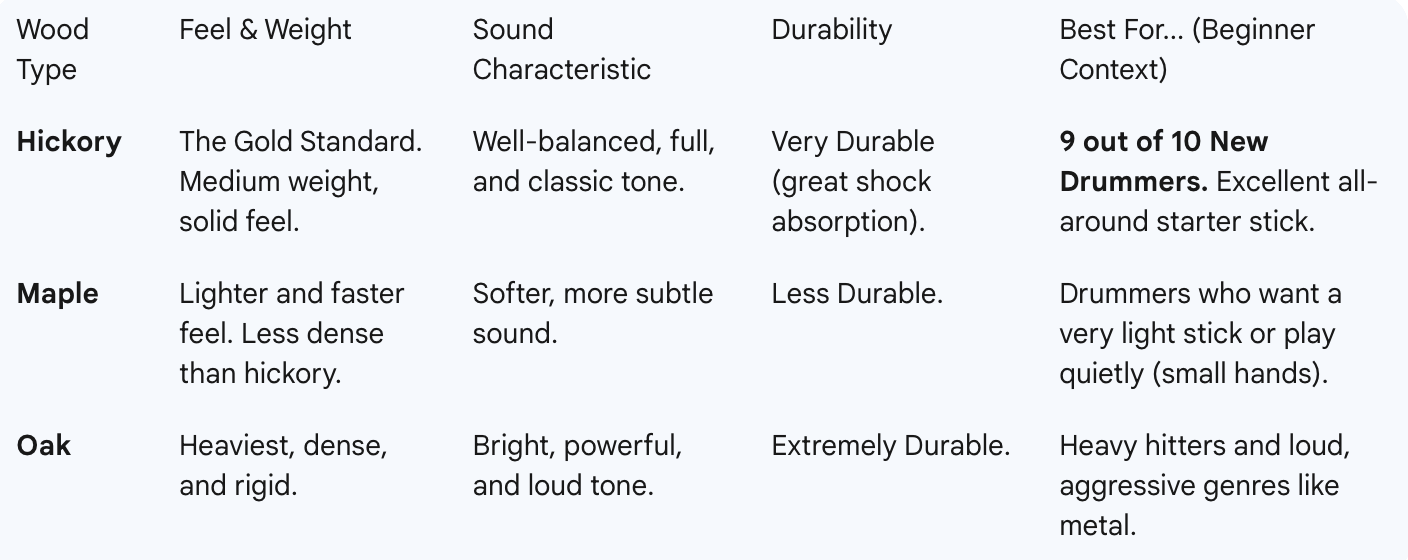
2. Nylon Tips
You’ll notice some sticks have little plastic tips instead of wood ones.
Sound: Nylon tips produce a very bright, crisp, and cutting sound on cymbals—much sharper than wood. Think high definition cymbal clarity.
Durability: They are incredibly durable and won't chip or pit like wood tips eventually do.
The Catch: They feel a little different and can sometimes pop off if you hit hard. I recommend starting with wood tips to learn the natural acoustic sound, but nylon is a great option once you’re chasing a brighter tone.
3. 📏 The Crucial Code: Understanding the Sizing System (5A, 7A, 2B, etc.)
This is the part that usually throws folks off, but it's simple: sticks are named with a Number and a Letter.
A. The Number: Diameter and Weight
The number indicates the diameter (thickness) of the stick. Remember: The lower the number, the thicker the stick.
7 (Thinnest): Sticks like the 7A are thin and light. Great for low volume playing (jazz, acoustic) and for younger players or drummers with small hands. High finesse, low power.
5 (Medium/Standard): Sticks like the 5A and 5B are the best selling sticks globally and are the industry standard benchmark. They offer the perfect balance of weight, power, and speed.
2 (Thickest): Sticks like the 2B are thick and heavy. Designed for maximum power, volume, and durability (heavy rock, marching).
B. The Letter: Taper and Application
The letter initially indicated the stick’s intended use, and it generally still points to the stick's overall shape, taper, and power.
A (Orchestra/General Purpose): These tend to have a medium to long taper, making them slightly thinner and more balanced for finesse and general use. 5A is the king here.
B (Band/Heavy Use): These sticks have a shorter, thicker taper that makes them beefier, heavier, and more durable for hard playing. 5B is your entry level power stick.
S (Street/Marching): The thickest, heaviest sticks, typically for loud marching drum lines. Too big for kit drumming as a beginner.
🎯 Wesley’s Recommended Starting Sticks
You’re walking into a store today? Here are my three hickory suggestions:
1. The Gold Standard: The 5A
Why: It’s the starting line for 90% of drummers. It has the ideal diameter and weight for learning proper grip, rebound, and control. It works for pop, country, jazz, and moderate rock. If you buy one stick, buy this one.
2. The Power Option: The 5B
Why: If you know you want to play rock, metal, or other loud genres—the kind of music that rattles the speakers—the 5B is thicker and gives you more mass and volume. It’ll also help you develop good forearm strength quickly.
3. The Light Option (for smaller hands): The 7A
Why: If you’re a smaller player or are finding the 5A tiring right away, the 7A is a fantastic, lightweight stick that helps build proper technique without unnecessary strain. It promotes a very relaxed grip.
4. The Most Important Factor: Finding the Perfect Balance
I can throw specs and codes at you all day, but ultimately, the feel of the stick in your hand is what truly matters. We’re looking for the balance point , which is the spot where the stick naturally pivots when held loosely between your thumb and index finger (your fulcrum ).
The Rebound Test
Hold the stick loosely at that fulcrum point. (About one third of the way up from the butt end).
Drop the tip onto a practice pad or your snare drum.
A well balanced stick will bounce back naturally and repeatedly with very little effort from you. This is rebound, and it is the single most important physical property of a drumstick.
A good stick does the work for you. If you have to muscle the stick back up, or if it just thuds into the drumhead, the stick is too heavy or your grip is too tight. For a new drummer, finding a stick with great natural rebound (like a 5A with a medium taper) will train your hands to be relaxed and allow the stick to bounce, which is essential for speed and control down the road.
5. ✋ Technique and Your Stick Choice: Why Thicker Isn't Always Better
It's a rookie mistake to think you need a huge, heavy stick to play loud rock music. But as a new drummer, using a very heavy stick can actually hinder your technique development.
1. The Fatigue Factor
Heavy sticks demand more muscle effort to lift and stop. Early on, your hands and forearms tire quickly, forcing you to cut practice sessions short. A medium weight stick (5A) lets you practice for longer sessions, which is crucial for building solid muscle memory.
2. Developing Proper Grip (The Fulcrum)
A lighter stick forces you to use a relaxed grip, focusing the power in your wrists and fingers, not your shoulders. A heavy stick encourages a death grip —clamping down in your palm—which leads to a stiff sound and potential injury. Start light to learn relaxation and control.
3. Dynamics and Control
Playing the drums isn't just about volume; it's about control. A stick that is too heavy makes playing softly (what we call dynamics) nearly impossible. A versatile stick (5A) allows you to explore the full range of drumming—loud hits, quiet ghost notes, and everything in between.
6. 🧐 Other Considerations Before You Check Out
1. The Cost
A good pair of hickory drumsticks from a reputable brand (Vic Firth, Vater, Promark, Zildjian) will run you about \$10 to \$15 USD. Do not buy the cheapest "no name" sticks you can find. They are often poorly balanced, made of soft wood, and will splinter easily. You wouldn't put cheap gas in a good truck; don't use bad sticks on your kit.
2. Practice Sticks
When you buy your first pair, I strongly suggest getting a second pair that is slightly different (maybe a 5A and a 5B) and designating one as your "Practice Pad Sticks."
Keep one pair exclusively for your acoustic kit/cymbals.
Keep the other pair strictly for your rubber practice pad.
This helps you learn the difference in feel and sound when moving between surfaces, and it saves wear and tear on your good performance sticks.
3. Stick Length
Most sticks are between 15 and 17 inches long.
Longer Sticks: Give you more reach across a big kit and a slightly heavier leverage.
Shorter Sticks: Give you a more compact feel and faster response.
Most 5A sticks are around 16 inches, which is perfect for a starter.
7. 🛒 Your First Shopping Trip: Wesley’s Action Plan
It’s time to head to the music store! Don’t just grab the first pair on the rack. Use the knowledge you’ve gained:
Step 1: Head to the Stick Rack
Ask the salesperson (or look for yourself) for the best selling, standard hickory sticks.
Step 2: Grab the Core Three
Take a 7A, a 5A, and a 5B (all in hickory with wood tips) into your hands.
Step 3: The Hand Test
Hold each stick loosely in your preferred grip.
Does your hand close completely around the stick, making your fingers bunch up? It's too thick (maybe the 5B for you).
Does the stick feel like a pencil—too flimsy? It's too thin (maybe the 7A for you).
Do you feel like you have enough stick to hold comfortably, with a little space left? That's the ideal diameter.
Step 4: The Rebound Test (Ask Politely!)
If the store has a small practice pad or drum, ask if you can test the sticks on it. This is vital.
Hold the stick loosely at the fulcrum.
Let the stick fall naturally onto the surface.
Which stick bounces back most effortlessly? That's the one that promotes the best technique.
Step 5: Buy Two Pairs of Your Winner!
You will break or lose your first pair of sticks quickly, and you don’t want to be sidelined. Buy at least two pairs of the one you choose (which, let's be honest, is likely the 5A).
📝 A Final Word of Encouragement
Choosing your sticks is a tactile, personal process. There is no one "perfect stick" for everyone, but the Hickory 5A is the perfect place to start your journey. It is the blank slate of drumming, allowing you to focus purely on your technique and sound, without the stick dictating your playing.
As you grow, your taste will change. You might find you need the raw power of a 2B for a heavy Southern rock gig, or the delicate finesse of a 7A for a quiet Bluegrass session. That’s the fun of it! But for now, get your 5A, get practicing, and never forget that feeling of being a beginner—it’s the start of the greatest gig you’ll ever have.
